By separating image elements into different layers you make it much simpler to move those elements or make changes to them without affecting the rest of the image. Photoshop puts text on its own layer when you are text or numbers to your image. This not only makes it easier to edit the text once it’s been added, but it also makes it easy to move. Our tutorial below will show you how to move text in Photoshop by selecting the text layer and dragging it to the desired position.
How to Move Text in Photoshop
Our guide continues below with additional information on how to move text in Photoshop, including pictures of these steps. If you’re like me, then new text layers that you create in Photoshop CS5 rarely end up in the correct location. Whether the text ends up being different or larger, or your design ideas change, it’s rare that the initial text location ends up being the final location. But you can easily move the location of your text with Photoshop’s Move Tool, allowing you to have complete control over the location of text that you have added in Photoshop.
Moving a Photoshop Text Layer (Guide with Pictures)
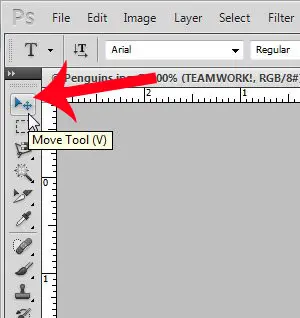
The steps in this article will assume that you have already created a text layer in your Photoshop image, and that you want to move it to a different location in the image. If you have not yet created a text layer, this article will show you how. Now that you know how to move text in Photoshop you will be able to fix text layers in the future that are in the wrong location. If the Layers panel is not visible, press the F7 key on your keyboard. It’s the one that looks like an arrow with a cross next to it. Note that you can also use the arrow keys on your keyboard for some more precise movement than you might be able to get with your mouse. Is there something about your text layer that you want to change? Learn how to edit a text layer in Photoshop CS5 to get it exactly how you want it to be. In the toolbar at the left side of the window there is a Text tool that is identified by a “T.” If you right click on that icon, there is a Vertical Type Tool and a Horizontal Type Tool that you can choose from, depending on it you want your text box to go horizontally or vertically in your image. Once you have chosen the correct tool, simply click inside your Photoshop document canvas and start typing. Note that you can use the Character Panel to make changes to selected text if you want to change the font, the size, the line spacing, the color, or any of a number of other font options. But as you start familiarizing yourself with that part of Photoshop, it might not be so easy to identify a text layer in comparison to other types of layers. One easy way to do this is to double-click on the layer in your image. This will highlight that layer. If the layer highlight shows a “T” next to the one or more characters in the word, then it’s a text layer. If the layer icon shows a smaller version of the content contained on that layer, then it’s a pixel object rather than a type layer. If you’ve decided that you want to use the character panel to edit your font color, font size, font type, but you don’t see that panel, you can display it by selecting the Windows option from the menu at the top of the window, then click the Character option. You can do this by clicking on an object in that layer then dragging it to a different spot. But with the Move tool selected, you can also use the arrow keys on your keyboard to reposition objects as well. This can make it much easier to perform precise movements within your Photoshop file and get your image objects to the location where you want them. Our guide on how to flip a layer in Photoshop includes some useful ways for you to rotate parts of your images.
More Information on Moving Photoshop Text Layers
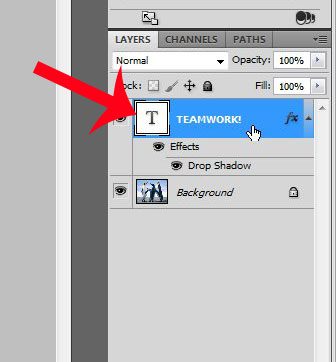
If you don’t select the text layer from the Layers panel, but attempt to select it by clicking on it on the canvas, it’s pretty easy to move the entire image instead of just the text layer. Alternatively, you may have automatically created another text layer if you still had the Type tool selected and clicked somewhere on the canvas. You can undo any incorrect action that you take with the undo keyboard shortcut of Ctrl + Z, or by clicking the Edit tab at the top of the window and choosing the Undo option. This same action can be used to move other layers in Photoshop that aren’t text layers, too. The only problem you may encounter is if you attempt to move a locked layer, as Photoshop requires a layer to be unlocked before you can edit it. You can unlock a Photoshop layer so that you can move it by clicking on the lock icon on the layer, then dragging it to the trash can at the bottom of the Layers panel. You may also notice an eye icon on the layer as well. You can click that icon to hide or unhide the entire layer. When you select the Type tool in the toolbox you are going to see a control panel or options bar above the canvas. Here you can select a different font for the text layer, align the text, change the color, or even warp text if you would like it to look a bit different. As you drag the text up[ and down on the canvas, you may notice a horizontal line that appears as you are near the middle of the image. These indicate the vertical centers of the image, in case you are attempting to drag that layer to the center of the image. After receiving his Bachelor’s and Master’s degrees in Computer Science he spent several years working in IT management for small businesses. However, he now works full time writing content online and creating websites. His main writing topics include iPhones, Microsoft Office, Google Apps, Android, and Photoshop, but he has also written about many other tech topics as well. Read his full bio here.
You may opt out at any time. Read our Privacy Policy