Most default Photoshop CS5 images will have a white background. Maybe you have made some changes to your default settings to use a different default color, or even a transparent background, but it is likely that you will eventually need a different color background. Fortunately, learning how to fill a background layer in Photoshop CS5 is a very simple process, and it can be applied to any other layer in almost any other image as well. Your fill options are not limited to solid colors, either. You can also fill your background with a pattern, or you can use the content-aware feature introduced in Photoshop CS5. We will even show you how to change an existing background color in Photoshop CS5 with a bonus guide at the end of this article.
How to Fill in Background in Photoshop
Our article continues below with additional information on filling a background layer in Photoshop, including pictures of these steps. You can use a similar process to create a transparent background Photoshop image by removing background fill colors instead of adding them.
How to Fill Photoshop CS5 Background Layer (Guide with Pictures)
For the purposes of this tutorial, we will be filling the Photoshop CS5 background layer with a solid color. It is the most basic and the most common option, and it will produce the exact same result for everyone. There are a lot of interesting effects that you can produce with patterns and the content-aware tool, but they require more customization and will have markedly different results for different images.
Step 1. Begin by opening the image with the background layer that you want to fill.
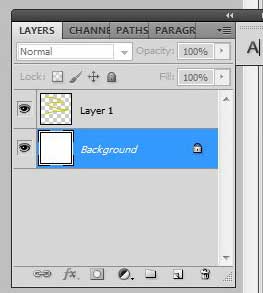
If the Layers panel is not visible at the right side of the window, press the F7 key on your keyboard to display it.
Step 2. Click the Background Layer from the Layers panel.
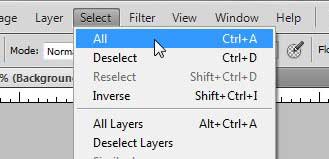
Step 3: Click Select at the top of then window, then click the All option.
Conversely, you can press Ctrl + A on your keyboard to select the entire layer.
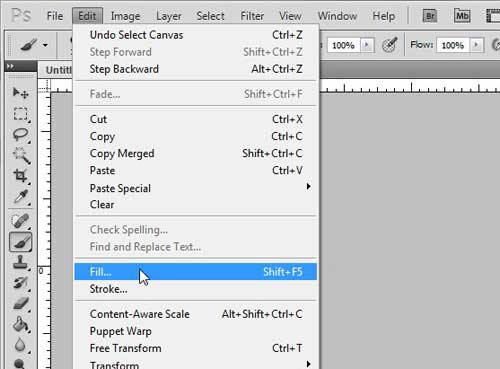
Step 4: Click Edit at the top of the window, then click Fill.
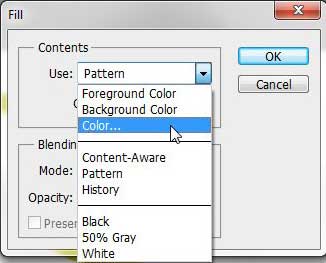
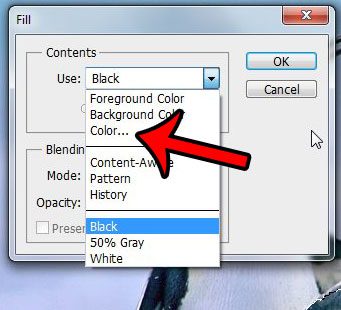
Step 5: Click the drop-down menu to the right of Use, then click the Color option.
Step 6: Click your mouse on the color with which you want to fill the background layer, click the OK button to select the color, then click the OK button again to fill the background layer of your Photoshop CS5 image.
As always, if you do not like the effect it creates, you can always press Ctrl + Z on your keyboard to undo the last change. You can learn more about using the Fill command in Photoshop CS5 by reading this article. Tip – If you have added image elements to your background and are not certain that you want to lose them, consider creating a new layer above your background layer, then filling that layer. That way you will not lose the background layer data if you change your mind. If the above steps aren’t working for you because the background that you wish to change is actually part of a layer that contains other objects, then try out the following steps below instead.
How to Change Background Color of an Image in Photoshop CS5
This set of steps will be focusing on separating the background of your image from the foreground objects so that you can change the colors. This works best for images where there is a defined contrast between the background and foreground objects. If the colors are very similar, or if you have foreground elements that don’t stand out significantly from the background, then this becomes much more difficult.
Step 1: Open the image in Photoshop CS5.
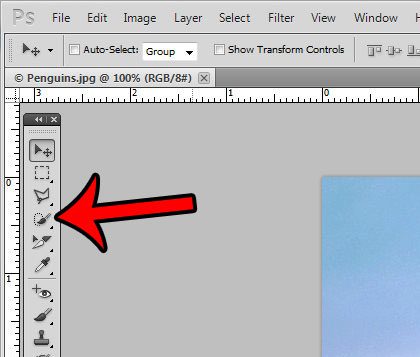
Step 2: Click the Quick Selection Tool in the toolbox.
It is the fourth item from the top. If you hover over that tool and it says “Magic Wand Tool,” then you will need to right-click it and select the “Quick Selection Tool.”
Step 3: Click on the foreground object until it is entirely selected.
In the example image below, I clicked on parts of the penguin until it was selected.
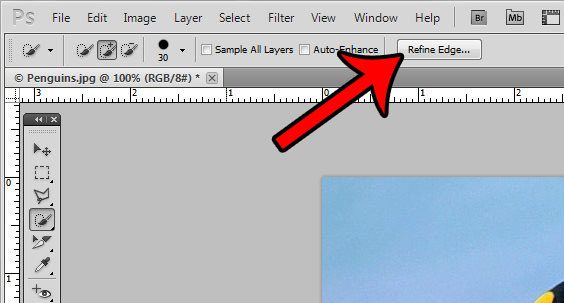
Step 4: Click the Refine Edge button at the top of the window.
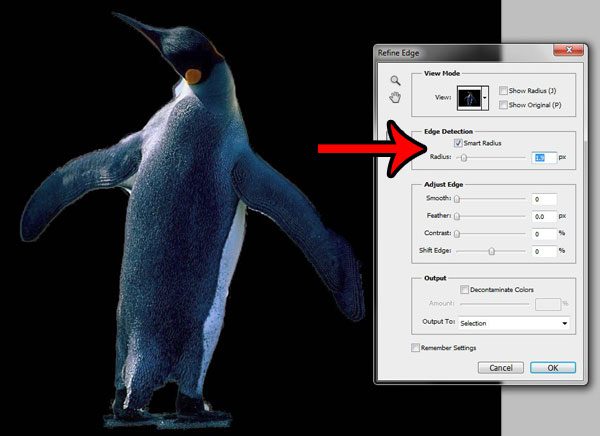
Step 5: Check the box to the left of Smart Radius, then drag the Radius slider until your selected object looks correct. You can then click the OK button at the bottom of the window.
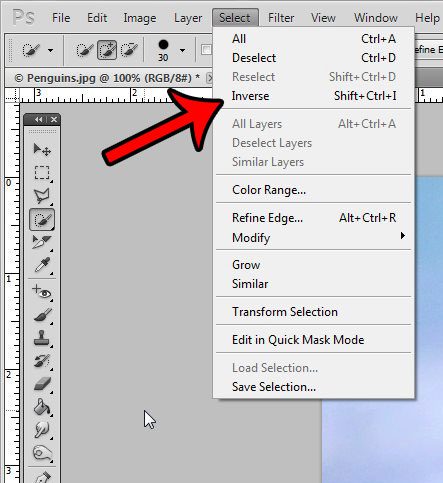
Step 6: Click Select at the top of the window, then click the Inverse option.
This selects everything but the object that you selected in the previous steps.
Step 7: Click Edit at the top of the window, then click Fill.
Step 8: Click the drop-down menu to the right of Use, then click the Color option.
Step 9: Click the new color that you would like to use for your background image, then click the OK button.
The background color of your Photoshop image should now be changed.
Additional Sources
After receiving his Bachelor’s and Master’s degrees in Computer Science he spent several years working in IT management for small businesses. However, he now works full time writing content online and creating websites. His main writing topics include iPhones, Microsoft Office, Google Apps, Android, and Photoshop, but he has also written about many other tech topics as well. Read his full bio here.
You may opt out at any time. Read our Privacy Policy
