Since file compression has become much more important, Windows has improved the process that you need to follow when you want to know how or create a zip file in Windows 10. It’s now something that you can do from almost any folder location on your computer. It’s also a fairly simple process, and the file size reduction that you achieve when you zip files can solve a lot of problems that you might have encountered before when you were trying to share large numbers of files or pictures with someone over email.
How to Zip a File in Windows 10
Our guide continues below with additional information on how to create a zip file in Windows 10, including pictures of these steps. Another helpful utility in Windows that you may want to learn about is the snipping tool. Our article on how to take a screenshot on an Acer laptop provides instructions for using it. The ability to zip files and folders in Windows 10 provides a couple of benefits. You can reduce the size of a file by zipping it, and you can turn an entire folder of files into a single file and make it easier to share. But if you’ve never zipped a file in Windows 10 before, then you may be having trouble figuring out how to create one. Luckily the process involves just a couple of steps. Our tutorial below will show you how to zip a file in Windows 10 using only the utilities found in the operating system by default. Check out our tutorial on how to make an Acer laptop screenshot if you need to capture images of the things you see on your laptop or desktop computer.
How to Make a Windows 10 Zip File (Guide with Pictures)
The steps in this article were performed on a computer with the Windows 10 operating system. However, these steps also work in some earlier versions of Windows as well, including Windows 7.
Step 1: Locate the file that you wish to put into a zip file.
I am simply zipping a single file in this guide, but you could also zip a folder as well.
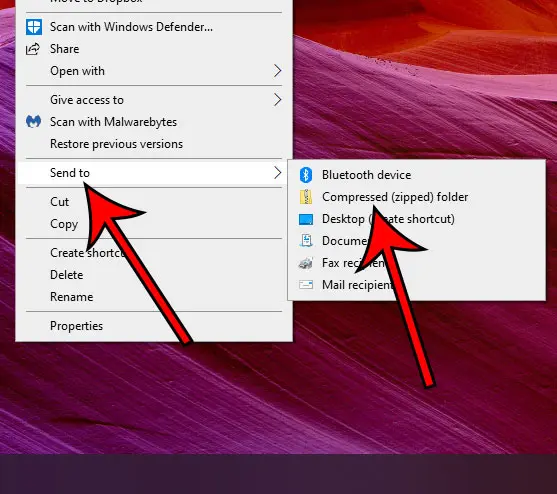
Step 2: Right-click on the file, choose the Send to option, then click the Compressed (zipped) folder option.
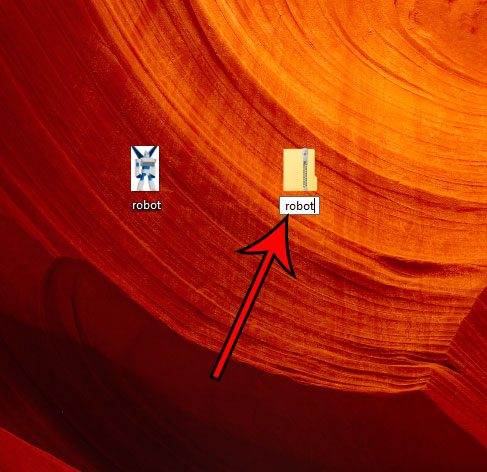
Step 3: Change or accept the filename, then press the Enter key on your keyboard.
Now that you know how to create a zip file in Windows 10 you can use this to quickly send a large number of files or to reduce the size of a file or files that are slightly too big to send through email. Note that the zipped file will need to be unzipped before it can be used. You can unzip a file by right-clicking on it, choosing the Extract All option, then clicking the Extract button. Find out how to connect an Xbox controller to your Windows 10 Bluetooth computer if you would like to use it to play some games.
Additional Sources
After receiving his Bachelor’s and Master’s degrees in Computer Science he spent several years working in IT management for small businesses. However, he now works full time writing content online and creating websites. His main writing topics include iPhones, Microsoft Office, Google Apps, Android, and Photoshop, but he has also written about many other tech topics as well. Read his full bio here.
You may opt out at any time. Read our Privacy Policy


