If you make something really interesting, you will probably be tempted to display it on a website or in a document so that you can share it with others. Unfortunately, it is very difficult to share a Photoshop PSD file with someone that does not have Photoshop, so you will find a more compatible file type, such as a JPEG. However, if your PSD file has any transparency in it, the JPEG will display those empty pixels as white. If white pixels are really distracting from the appearance of your image, you can convert a transparent Photoshop PSD to the PNG file format and preserve the transparency. Our change background to transparent Photoshop tutorial will show you the steps ot take if the background of your image isn’t currently transparent and you need it to be.
Saving Your PSD File Containing Transparency as a PNG File
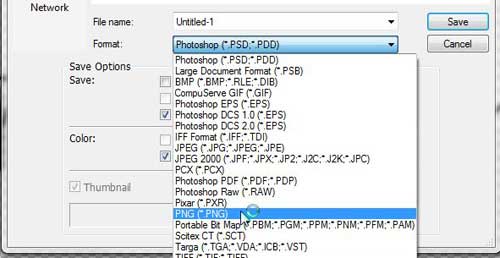
While many people might be more familiar with the JPEG and GIF file formats, the PNG file format is also very popular, largely due to its’ ability to preserve transparency. This gives Web designers a lot more freedom with the images that they create, and doesn’t include any real negatives as opposed to using JPEG or GIF files. Begin the process of converting your Photoshop PSD to a PNG file by double-clicking the PSD file to open it in Photoshop. Make any changes or adjustments to the image until you are satisfied with its current appearance. When you convert the PSD to a PNG file, you are actually going to be creating a separate, single layer file. Check each of your layers to ensure that none of them contain colored pixels, since all of the layers will be merged into one. For example, your bottom layer might have a lot of transparent pixels but, if you added another layer above it that included a white background, then the white background layer will be merged on top of the lower transparency, thereby eliminating those values. When the image is ready to be converted, click File at the top of the window, then click Save As. Click the drop-down menu to the right of Format, then choose the PNG option. Type a name for the PNG file into the File name field, then click the Save button at the right side of the window. Click the OK button on the next pop-up window to convert your PSD file to the PNG file format. After receiving his Bachelor’s and Master’s degrees in Computer Science he spent several years working in IT management for small businesses. However, he now works full time writing content online and creating websites. His main writing topics include iPhones, Microsoft Office, Google Apps, Android, and Photoshop, but he has also written about many other tech topics as well. Read his full bio here.
You may opt out at any time. Read our Privacy Policy

