Hence, many users fail to import iPhone contacts to their new Android phones, or to another device where they would like to be able to access their iPhone contacts with Gmail. But you don’t have to worry about that as we have an option that can help you out with this process. Here we will discuss how to back up iPhone 13 contacts to Gmail. From our detailed guide, you’ll get the simplest methods to save iPhone contacts and sync them to your iOS devices or any other mobile device. So without wasting much time, let’s dive right in.
How to Backup Contacts from iPhone 13 to Gmail
Our guide continues below with additional information on exporting iPhone contacts to Gmail.
How to Transport iPhone 13 Contacts to Your Gmail Account – Step by Step
To successfully export contacts to a new phone, you have to sync iPhone contacts to Gmail. As your Gmail account is a part of Google’s services, it’s a completely safe platform to save all your iPhone contacts in your Google Drive, thanks to your Gmail account. There are three ways of transferring contacts to Gmail. You can use iCloud or your iPhone settings app for syncing. Or, you can do it by using iTunes. We will describe all three methods for you so that you can choose one that works for your phone.
Method One – Sync iPhone 13 Contacts Using Your iCloud Account
When compared to the other two methods, this one is a bit complicated and involves more steps to complete the backup process. Yet, using iCloud for syncing iPhone contacts is the most effective way for any iPhone model. Remember that, for all three methods, you have to own a Gmail account. Follow the steps we have given below to export iPhone contacts to your Gmail.
Step 1: Open Your iPhone Settings
From your iPhone home screen, go for the gear icon to open the ‘Settings’ app. If you fail to find it from your home screen, then swipe down from the middle of your screen and type the word “settings’ Into the search field at the top of the screen. You can then tap on the Settings app listed on this Spotlight Search screen.
Step 2: Access Your iCloud Account
On the settings page, you’ll see your name at the top of your screen. Tap on it to log into your Apple account. In case you haven’t saved your Apple ID on that device, you need to type your password to log into your Apple ID. After that, you need to tap ‘iCloud’, and a new page will appear. There you’ll see the option ‘Contacts’. Tap on it to move the slider and set it to ‘ON’. It will make the toggle go green. This way, you have completed the syncing process with iCloud and all the contacts on your phone are synced with your iCloud account.
Step 3: Download iCloud Contacts to Your Computer
To easily download and import contacts to any device, you need to download the previously synced phone contacts as a .VCF file from the iCloud website. First, make sure you have a stable Wi Fi network connection and the latest iCloud version. From your computer, open a safe browser and then go to the website iCloud.com. Log into your iCloud and Apple account if needed. From the next screen, you need to select the gear icon so that a drop-down menu will appear. Select ‘All Contacts’ from the menu. As all of your Google contacts are now selected, select the gear icon once again. Then choose the option ‘Export vCard’. As the next screen will appear, choose a download location to save your contacts file and then click ‘Save’. Now all your iPhone contacts are downloaded on your device as a vCard file.
Step 4: Import iPhone Contacts
Now it’s time to import contacts directly to your Gmail. From your computer, go to Gmail and log into your account. Click the Google Apps button at the top-right of the window and a new menu will appear. Choose the ‘Contacts’ app from there. As the contacts app arrives, scroll down a bit there and click ‘Import Contacts’. A pop-up will appear now, and you need to choose the ‘Select File’ button. From the new window, click on the particular contacts file you need to import and then go for ‘Choose’. When the contact file is selected, choose ‘Import’ from the options below. This way, the iPhone contacts list will be imported to Gmail.
Method Two – Sync iPhone Contacts By Adding a Gmail Account Through Settings (Guide with Pictures)
If you find the previous method a bit troublesome, then you can simply use your phone settings to sync contacts, and after that, you can proceed to export iPhone contacts in Google Drive if you need to do something other than add them to your Gmail account. Here’s how to do it –
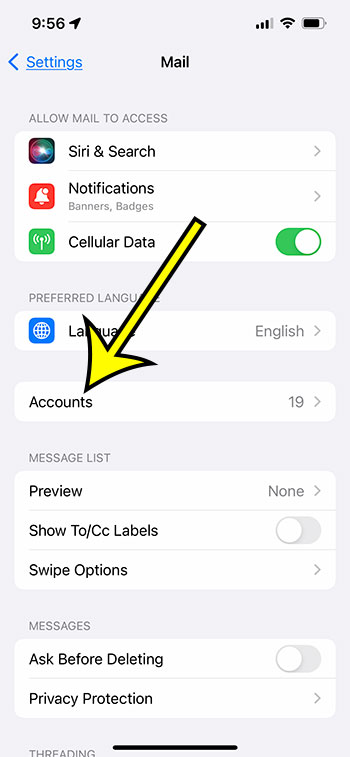
Step 1: Open Your iPhone Settings app, then choose Mail and tap Accounts.
From your iPhone home screen, tap ‘Settings’. You will then need to select ‘Mail’ and tap ‘Accounts.;
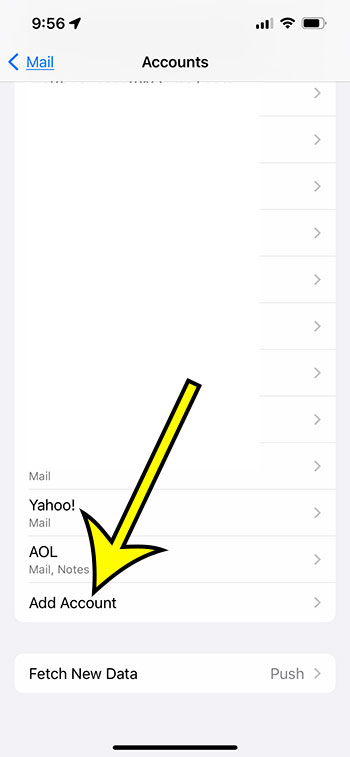
Step 2: Choose the Add Account option.
Select the ‘Add Account’ option that appears at the bottom of the list of accounts that are currently on your phone.
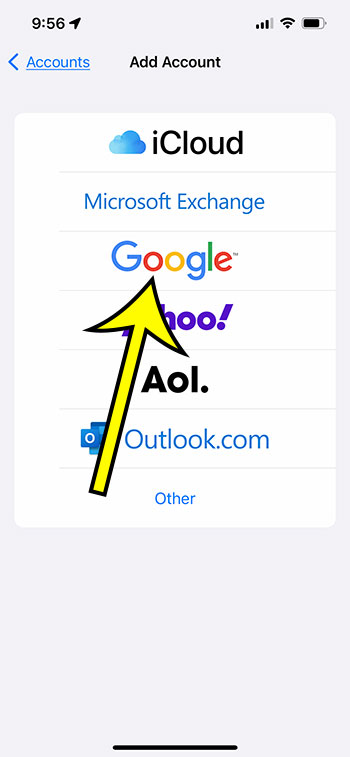
Step 3: Select the Gmail option.
Now you’ll be asked to provide some information like your Gmail ID details and password. Enter all the necessary information and follow the onscreen instructions for adding your Gmail account to your iPhone.
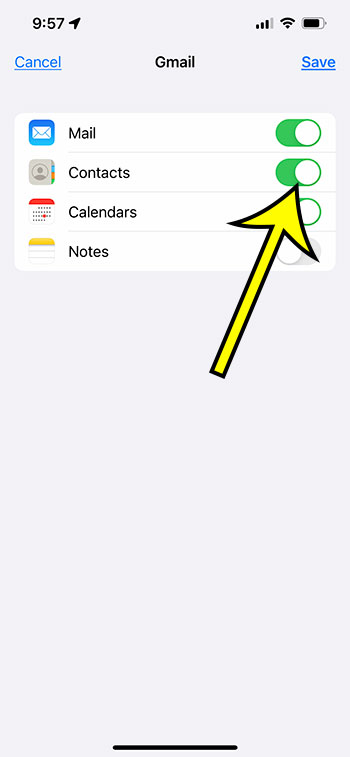
Step 4: Make sure that the Contacts option is turned on, then tap Save.
Tap the button to the right of Contacts to sync them, then touch the Save button at the top-right of the screen.
Method Three – Import iPhone 13 Contacts Via iTunes
To save iPhone contacts to Gmail, you can use the iTunes application if you want. It’s one of the well-appreciated methods, to be honest. However, before you transfer contacts via iTunes, you need to stop syncing with the iCloud app. To complete this task, just follow the steps we have given below to relocate iPhone contacts to Gmail ID.
Step 1: Connect the iPhone with your PC
Install the iTunes application and connect your iPhone with your Mac or Windows computer. You can perform this task with the help of a USB cable and then transport all the information without any issues. After that, proceed to the next step after launching the application.
Step 2: Sync Contacts
From iTunes, search for the option ‘Device’. Click on it and then choose the ‘Info’ button. Now go for the option ‘Sync Contacts With’. As a new menu will arrive, you need to select your desired Google Contacts. After that, a series of instructions will appear on the screen telling you how to sync your phone’s contacts with your Google account. All you have to do is follow the instructions line by line, and the syncing process will be done in minutes.
Step 3: Check out the Google Contacts
Now you need to check whether the sync was successful or not. For this, check out your google contacts option and ensure that all your necessary contacts are available there. And your job is done.
Final Words
So now you know about everything on how to back up iPhone contacts to Gmail. By following any of our methods, you can easily sync and save your contacts in your Google accounts whenever you want. Moreover, you can easily transfer your contacts to any device you want. Keep in mind that using the iCloud app is the most convenient way to sync iPhone contacts to Google or Gmail. So don’t forget to try it in the first place.
Additional Reading
He specializes in writing content about iPhones, Android devices, Microsoft Office, and many other popular applications and devices. Read his full bio here.


