Getting the Dell Dock
If you are reading this, then it’s likely that this program is already on your computer. However, if you are just thinking about getting it, you can download the dock from this link, then just follow the installation instructions to get it on your computer. If you need further help with the installation, or if you have removed the program and want to re-install it, follow the instructions in this article. The download page recommends that you use Internet Explorer or Firefox to download the file, but I was able to download it just fine with Google Chrome. The size of the download file is about 13 MB, so keep that in mind if you do not have a high speed Internet connection. The whole installation is pretty quick so, after the download, you will only have to wait a couple of minutes before you can get to customizing the dock.
Customizing Your Installation
Go and find your Dell Dock. It should be pretty easy to see, as it is the large set of shortcut icons on the top of your Desktop. Don’t worry if you don’t like having it at that location. You can move it to almost any other location on the screen.
Working with the Dell Dock After Installation
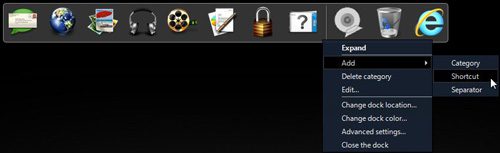
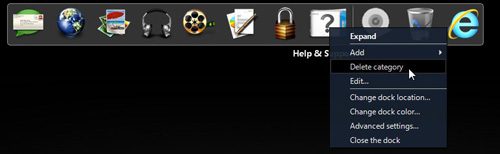
After the installation has completed, you will notice a new widget on your computer Desktop. It should look similar to the image above, with each icon representing a different category of actions. Essentially the Dell Dock offers another way to quickly access the commonly used folders and programs on your computer. To add an icon to the dock, simply right-click in an open space on the dock, click “Add” then click “Shortcut.” You can then drag a shortcut icon from your Desktop or Start menu to the dock. Once the icon is hovering over the dock, you can also customize where on the dock you want it positioned. If you want to delete an existing shortcut icon or category, you only have to right-click the icon, then click “Delete Category” or “Delete Shortcut.” In the image below, for example, I have chosen to delete the “Help and Support” category.
Change the Dell Dock Location
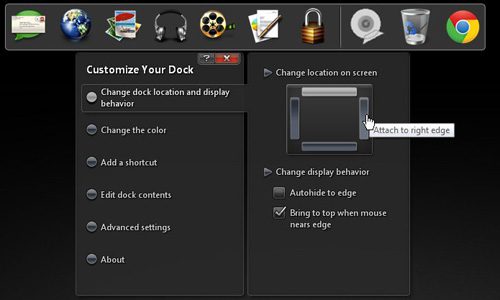
The final thing you will probably want to do is select where on the screen you want to locate the dock. The default option is the top of the screen, which I personally prefer. But, depending upon how you like to organize your Desktop, you might like another side better. To move the dock, right-click anywhere on the dock, then click “Change dock location.” This will show a menu like the one below
Click the “Change location and display behavior option at the left side of the menu, then click the screen position on the right side of the menu where you want to display the Dell Dock. For example, clicking where my mouse is hovering in the image would move the dock to the right side of the screen. Once you have learned the basics of the Dell Dock and how to modify it, you can experiment with the other options on the right-click shortcut menu to further customize its’ location, appearance and contents. After receiving his Bachelor’s and Master’s degrees in Computer Science he spent several years working in IT management for small businesses. However, he now works full time writing content online and creating websites. His main writing topics include iPhones, Microsoft Office, Google Apps, Android, and Photoshop, but he has also written about many other tech topics as well. Read his full bio here.